FortiGate 7.x Initial Setup — จาก Out-of-Box สู่ Production
คู่มือทีละขั้นตอน ตั้งค่า FortiGate 7.x ตั้งแต่เปิดกล่องจนพร้อมใช้งาน Production ครอบคลุม Login, Interface, Policy, NAT, DNS และ NTP
FortiGate เป็น Firewall ระดับ Enterprise ที่ใช้งานกว้างขวางในองค์กรทั่วโลก อย่างไรก็ตามสำหรับผู้ที่เพิ่งได้รับอุปกรณ์มาใหม่ การตั้งค่าครั้งแรกอาจดูซับซ้อน บทความนี้จะพาทำทีละขั้นตอนตั้งแต่เปิดกล่องจนถึง Production Ready บน FortiOS 7.x
1. สิ่งที่ต้องเตรียมก่อนเริ่ม#
ก่อน Power On ควรเตรียมสิ่งเหล่านี้ให้ครบ:
- FortiGate (รุ่นใดก็ได้ที่ใช้ FortiOS 7.0 ขึ้นไป เช่น 40F, 60F, 100F, 200F)
- Ethernet cable อย่างน้อย 2 เส้น — สำหรับต่อ MGMT/LAN และ WAN
- Serial number ของอุปกรณ์ — อยู่ด้านหลังหรือใต้ตัวเครื่อง หรือในกล่อง
- FortiCloud / Fortinet Support Portal account — สำหรับ Register License
- License key (VM-Series ต้องใช้ key แยก, Hardware รุ่น entry-level มักรวมมาใน box)
- PC หรือ Laptop ที่มี Ethernet port และ Web Browser รองรับ HTTPS
FortiGate Hardware รุ่น Entry เช่น 40F/60F มักไม่มี MGMT port แยก ให้ใช้ port1 (LAN) แทน IP Default คือ 192.168.1.99 สำหรับ port เชื่อมต่อครั้งแรก
2. เชื่อมต่อกับ MGMT Port + IP ตั้งต้น#
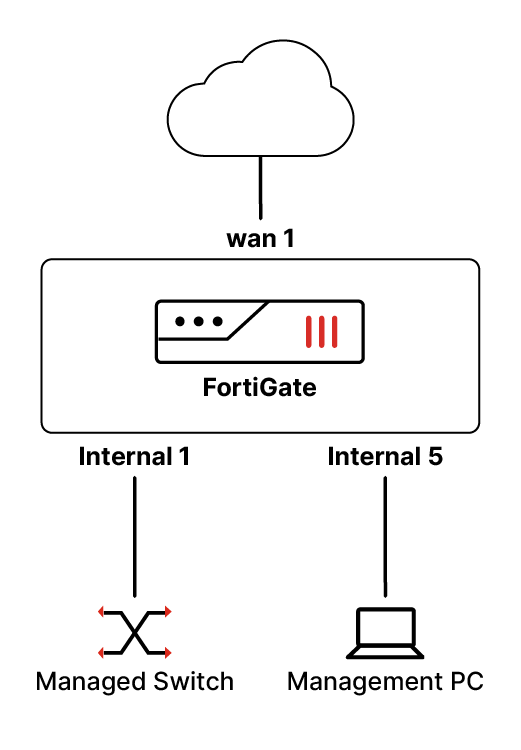
ขั้นตอนการเชื่อมต่อทางกายภาพ:
- ต่อ Ethernet cable จาก PC โดยตรงเข้า port1 หรือ MGMT ของ FortiGate
- ต่อ Ethernet cable จาก ISP Modem/Router เข้า WAN1 (หรือ wan1 ตามรุ่น)
- เปิดสวิตช์ไฟ FortiGate รอประมาณ 60-90 วินาทีจนไฟ Status เขียวคงที่
ตั้งค่า IP บน PC ให้อยู่ใน Subnet เดียวกับ FortiGate:
IP Address  : 192.168.1.100
Subnet Mask : 255.255.255.0
Gateway     : 192.168.1.99
หรือปล่อยให้ DHCP ถ้า FortiGate เปิด DHCP Server บน port1 ไว้ (Default บางรุ่น)
3. Login ครั้งแรก + เปลี่ยนรหัส Admin#
เปิด Browser แล้วไปที่ https://192.168.1.99
Browser จะแจ้ง Certificate Warning เนื่องจาก FortiGate ใช้ Self-signed Certificate — ให้คลิก Advanced → Proceed เพื่อดำเนินต่อ ห้ามใช้ HTTP เพราะระบบจะ Redirect ไป HTTPS อยู่แล้ว
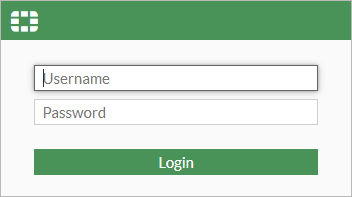
ข้อมูล Login Default:
| Field | ค่า Default |
|---|---|
| Username | admin |
| Password | (เว้นว่าง — ไม่ต้องพิมพ์อะไร) |
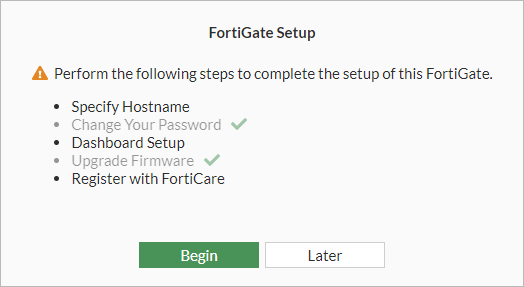
หลัง Login ครั้งแรก FortiOS 7.x จะบังคับให้ตั้งรหัสผ่านใหม่ทันที:
ตั้ง Password ที่แข็งแรง ควรมี:
- ความยาวอย่างน้อย 12 ตัวอักษร
- ผสม ตัวพิมพ์ใหญ่ พิมพ์เล็ก ตัวเลข และอักขระพิเศษ
- ห้ามใช้ชื่อองค์กร ชื่ออุปกรณ์ หรือคำทั่วไป
บันทึก Password ใน Password Manager ทันที อย่าจดลงกระดาษที่วางไว้ข้างอุปกรณ์
4. ตั้ง Hostname + Time + NTP (Asia/Bangkok)#
หลังเข้า Dashboard ไปที่ System → Settings
ตั้ง Hostname#
Hostname: FGT-BKK-01 (ใช้ชื่อสื่อถึง Location เช่น Office หรือ DC)
ตั้ง Timezone และ NTP#
ในหน้าเดียวกัน เลื่อนลงหา System Time:
Time Zone : (GMT+7:00) Bangkok
เปิดใช้ NTP และตั้ง NTP Server:
NTP Server 1 : 1.th.pool.ntp.org
NTP Server 2 : time.cloudflare.com
คลิก Apply และตรวจสอบว่าเวลาระบบถูกต้องก่อนดำเนินการต่อ — เพราะ Log timestamp และ Certificate Validity ล้วนขึ้นอยู่กับเวลาที่ถูกต้อง
5. ตั้งค่า WAN Interface (DHCP หรือ Static)#
ไปที่ Network → Interfaces เลือก wan1 แล้วคลิก Edit
กรณี DHCP (ISP กำหนด IP อัตโนมัติ)#
Addressing mode : DHCP
ระบบจะรับ IP, Gateway และ DNS จาก ISP โดยอัตโนมัติ คลิก OK แล้วรอ 10-15 วินาที ตรวจสอบว่า IP ปรากฏขึ้นใน Interface list
กรณี Static IP (ISP ให้ IP แบบ Fixed)#
Addressing mode : Manual
IP/Netmask      : 203.0.113.10/29
Default Gateway : 203.0.113.1
ข้อมูล IP Static ต้องได้รับจาก ISP — ตัวเลขด้านบนเป็นตัวอย่างเท่านั้น
หลังตั้งค่าเสร็จ ไปที่ Network → Static Routes ตรวจสอบว่ามี Default Route (0.0.0.0/0) ชี้ไปที่ Gateway WAN ของคุณ ถ้ายังไม่มีให้สร้างใหม่:
Destination  : 0.0.0.0/0
Gateway      : <IP Gateway ของ ISP>
Interface    : wan1
6. ตั้งค่า LAN Interface + DHCP Server#
ไปที่ Network → Interfaces เลือก port1 (หรือ internal/lan ตามรุ่น) แล้วคลิก Edit
Alias           : LAN
Role            : LAN
Addressing mode : Manual
IP/Netmask      : 192.168.10.1/24
เปิด DHCP Server สำหรับ LAN#
ในหน้า Interface เดียวกัน เลื่อนลงหา DHCP Server แล้วเปิดใช้งาน:
Address Range : 192.168.10.100 - 192.168.10.200
Netmask       : 255.255.255.0
Default GW    : 192.168.10.1
DNS Server 1  : 8.8.8.8
DNS Server 2  : 1.1.1.1
Lease Time    : 1 Day
คลิก OK — PC ที่ต่ออยู่ใน LAN จะเริ่มรับ IP ใหม่ผ่าน DHCP โดยอัตโนมัติ
ถ้า PC ยังใช้ Static IP 192.168.1.x อยู่ให้เปลี่ยนเป็น DHCP หรือตั้ง IP ใน Range ใหม่ (192.168.10.x) ก่อนดำเนินการต่อ
7. ลงทะเบียน License + เปิดใช้ FortiGuard#
FortiGate Hardware มี License พื้นฐานติดมาแล้ว แต่จำเป็นต้อง Register เพื่อ Activate FortiGuard Services
ไปที่ Dashboard → Status มองหา License Information widget หรือไปที่ System → FortiGuard
คลิก Register แล้วเลือกวิธี:
- FortiCloud Login — เข้าสู่ระบบด้วย Fortinet Support account
- License Key — กรอก Serial number + License key จากกล่องหรืออีเมลที่ได้รับจาก Partner
หลัง Register สำเร็จ FortiGuard Services จะแสดงสถานะ Licensed และเริ่ม Update Signature Database อัตโนมัติ
FortiGate ต้องเชื่อมต่อ Internet ได้ก่อนจึงจะ Register และ Activate FortiGuard Services ได้ — ทำ Step 5 ให้สำเร็จก่อน
8. ตั้งค่า DNS + System Settings#
ตั้ง DNS ระดับ System#
ไปที่ Network → DNS และตั้งค่า:
Primary DNS   : 8.8.8.8     (Google)
Secondary DNS : 1.1.1.1     (Cloudflare)
หรือใช้ DNS ของ ISP ถ้าต้องการ
ตรวจสอบ Management Access#
ไปที่ System → Settings ตรวจสอบ:
HTTPS Port  : 443 (หรือเปลี่ยนเป็น port อื่นเพื่อความปลอดภัย เช่น 8443)
SSH         : ปิดถ้าไม่ได้ใช้งาน
Telnet      : ปิดเสมอ
9. สร้าง Firewall Policy แรก: LAN → WAN (NAT enabled)#
ไปที่ Policy & Objects → Firewall Policy คลิก Create New
ตั้งค่า Policy ดังนี้:
| Field | ค่า |
|---|---|
| Name | LAN-to-WAN-Allow |
| Incoming Interface | port1 (LAN) |
| Outgoing Interface | wan1 (WAN) |
| Source | all หรือ Address Group LAN |
| Destination | all |
| Service | ALL |
| Action | ACCEPT |
| NAT | Enable (Use Outgoing Interface Address) |
NAT Enable คือสิ่งสำคัญที่สุดในขั้นตอนนี้ — FortiGate จะ Masquerade IP ของ LAN ออกไปเป็น IP WAN ทำให้ Client ภายในสามารถเข้าถึง Internet ได้
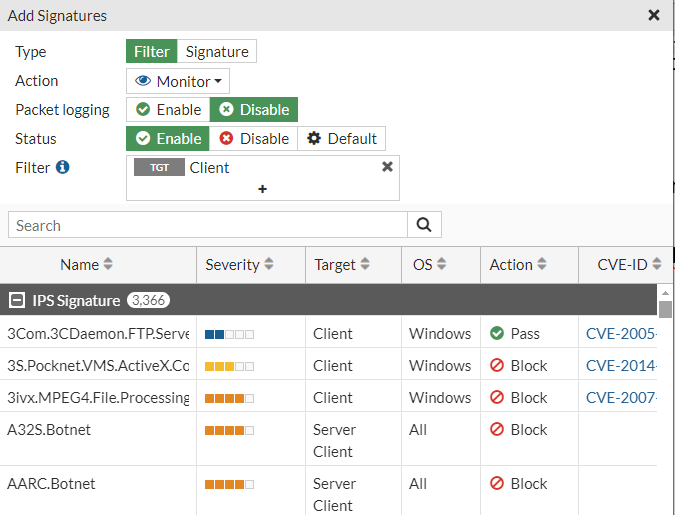
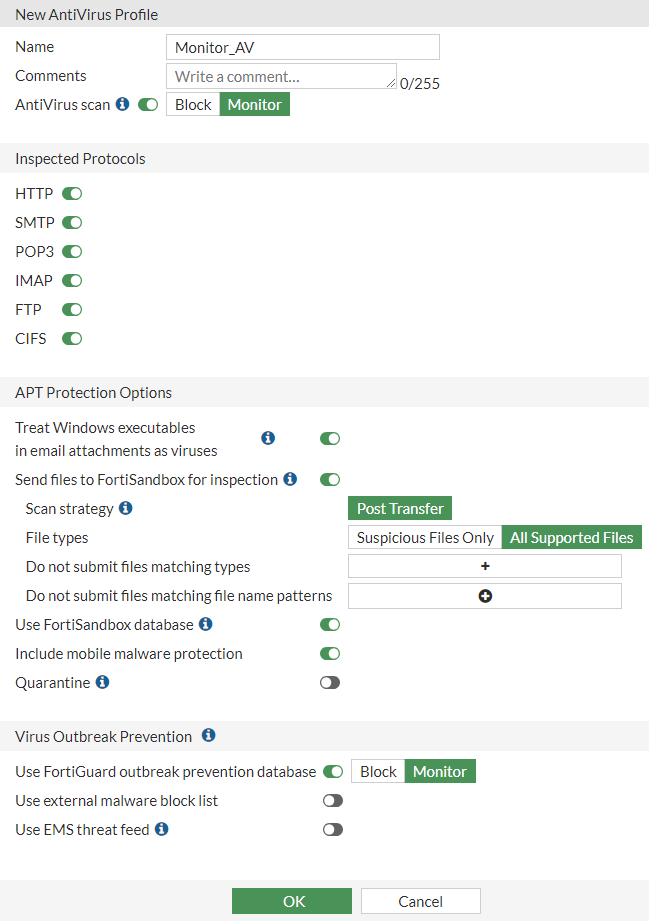
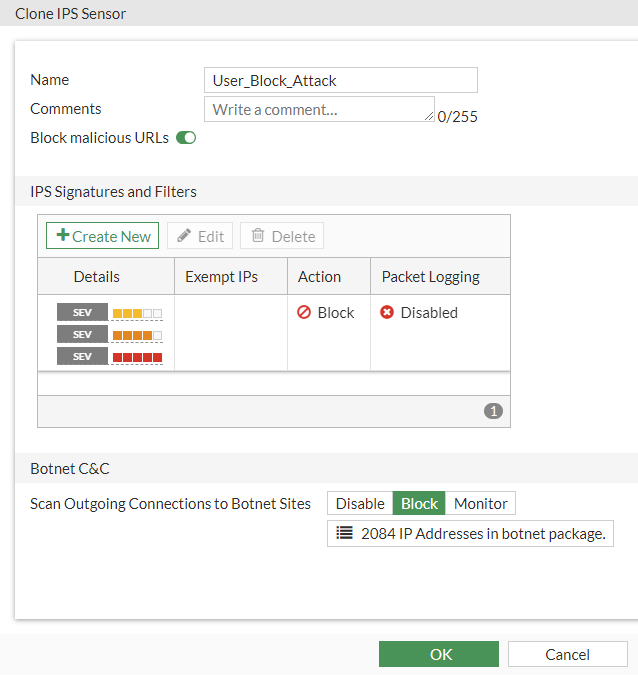
เพิ่ม Security Profile เพื่อ Monitor Traffic ตั้งแต่วันแรก:
| Profile Type | Action เริ่มต้นแนะนำ |
|---|---|
| Antivirus | Monitor |
| IPS | Monitor |
| Web Filter | Monitor (optional) |
| SSL Inspection | Certificate Inspection |
คลิก OK แล้ว Policy ใหม่จะปรากฏใน List
10. ตรวจสอบ Connectivity + ดู Log#
ทดสอบจาก PC ใน LAN#
# ทดสอบ DNS Resolution
ping 8.8.8.8

# ทดสอบ Internet Access
curl -I https://www.google.com
หรือเปิด Browser บน PC แล้วลองเข้า Website ภายนอก
ตรวจสอบ Log บน FortiGate#
ไปที่ Log & Report → Forward Traffic เพื่อดู Traffic ที่ผ่าน Policy
ตรวจสอบ:
- Action ควรเป็น
acceptสำหรับ LAN → WAN Traffic - NAT IP ควรแสดง IP WAN
- ถ้า Action เป็น
denyให้ตรวจสอบ Policy Order และ Source/Destination
ใช้ Diagnose Flow ใน CLI เพื่อ Debug ปัญหาได้แบบละเอียด:
diagnose debug flow filter addr 192.168.10.100
diagnose debug flow show console enable
diagnose debug enable
11. แนวปฏิบัติที่ดีหลัง Setup (Backup + Hardening)#
สำรอง Configuration#
ไปที่ System → Configuration → Backup แล้วเลือก Local PC หรือ USB ทำ Backup ทันทีหลัง Setup สำเร็จ
Format : .conf (FortiGate Configuration File)
บันทึกไฟล์ในชื่อที่สื่อความหมาย เช่น FGT-BKK-01_20260519_initial.conf
ปิด Service ที่ไม่ได้ใช้งาน#
| Service | คำแนะนำ |
|---|---|
| Telnet | ปิดเสมอ |
| HTTP Management | ปิด ใช้ HTTPS เท่านั้น |
| SSH | ปิดถ้าไม่จำเป็น หรือจำกัด Source IP |
| SNMP | เปิดเฉพาะถ้า Monitor จาก NMS |
| Ping (WAN) | ปิด ป้องกัน Reconnaissance |
Security Hardening เบื้องต้น#
- เปลี่ยน Management Port จาก 443 เป็น Non-standard port เช่น 8443
- Trusted Hosts — กำหนด IP ที่อนุญาต Login เข้า Admin ได้ ใน System → Administrators
- Two-Factor Authentication — เปิดใช้ FortiToken หรือ Email OTP สำหรับ Admin account
- Password Policy — ไปที่ System → Settings → Password Policy เพื่อบังคับความซับซ้อน
- Firmware Update — ตรวจสอบ FortiOS เวอร์ชันล่าสุดใน System → Firmware และ Update ถ้ามี Patch ใหม่
หลัง Update Firmware ควร Backup Configuration ใหม่อีกครั้ง เพราะ Format บางส่วนอาจเปลี่ยนแปลง
ตารางการบำรุงรักษาอย่างต่อเนื่อง#
- สัปดาห์ละครั้ง: ตรวจ Log ใน FortiAnalyzer หรือ Log & Report
- เดือนละครั้ง: Review Firewall Policy — ลบ Policy ที่ไม่ใช้งาน
- ทุก Quarter: ตรวจสอบ Firmware และ Update ตาม Fortinet Release Notes
หากองค์กรของคุณต้องการผู้เชี่ยวชาญช่วย Deploy FortiGate หรือต้องการบริการ Managed Firewall ที่ดูแล Policy, Log และ Update ให้ตลอด C9NETWORK ให้บริการ FortiGate Deployment และ Managed Security ครบวงจร พร้อมทีมงานที่มีประสบการณ์ตรงและเป็น Fortinet Partner อย่างเป็นทางการ สนใจปรึกษาฟรีได้เลย